Sri Lankan Inspired Coconut Chicken Curry with Cashews

This is exactly the sort of semi-ambitious dish which appeals to my palate and my ego in equal measure. Any old suburban hausfrau can whip up some Indian food these days, but Sri Lankan cuisine propels one to that next level of cooler-than-thou. Take that, Fancy Nancy!

This is a bit more labor intensive than my usual dishes, but truly flavorful and worth the extra effort. The sauce is heavenly and would go well with jasmine rice. I was lucky to have most of the spices on hand already; I shudder to think what this would cost if you were buying everything exclusively for this recipe. Even though the author admits parsnips are not part of Sri Lankan cuisine, I agree that they really are the perfect touch.

coconutcashewchicken

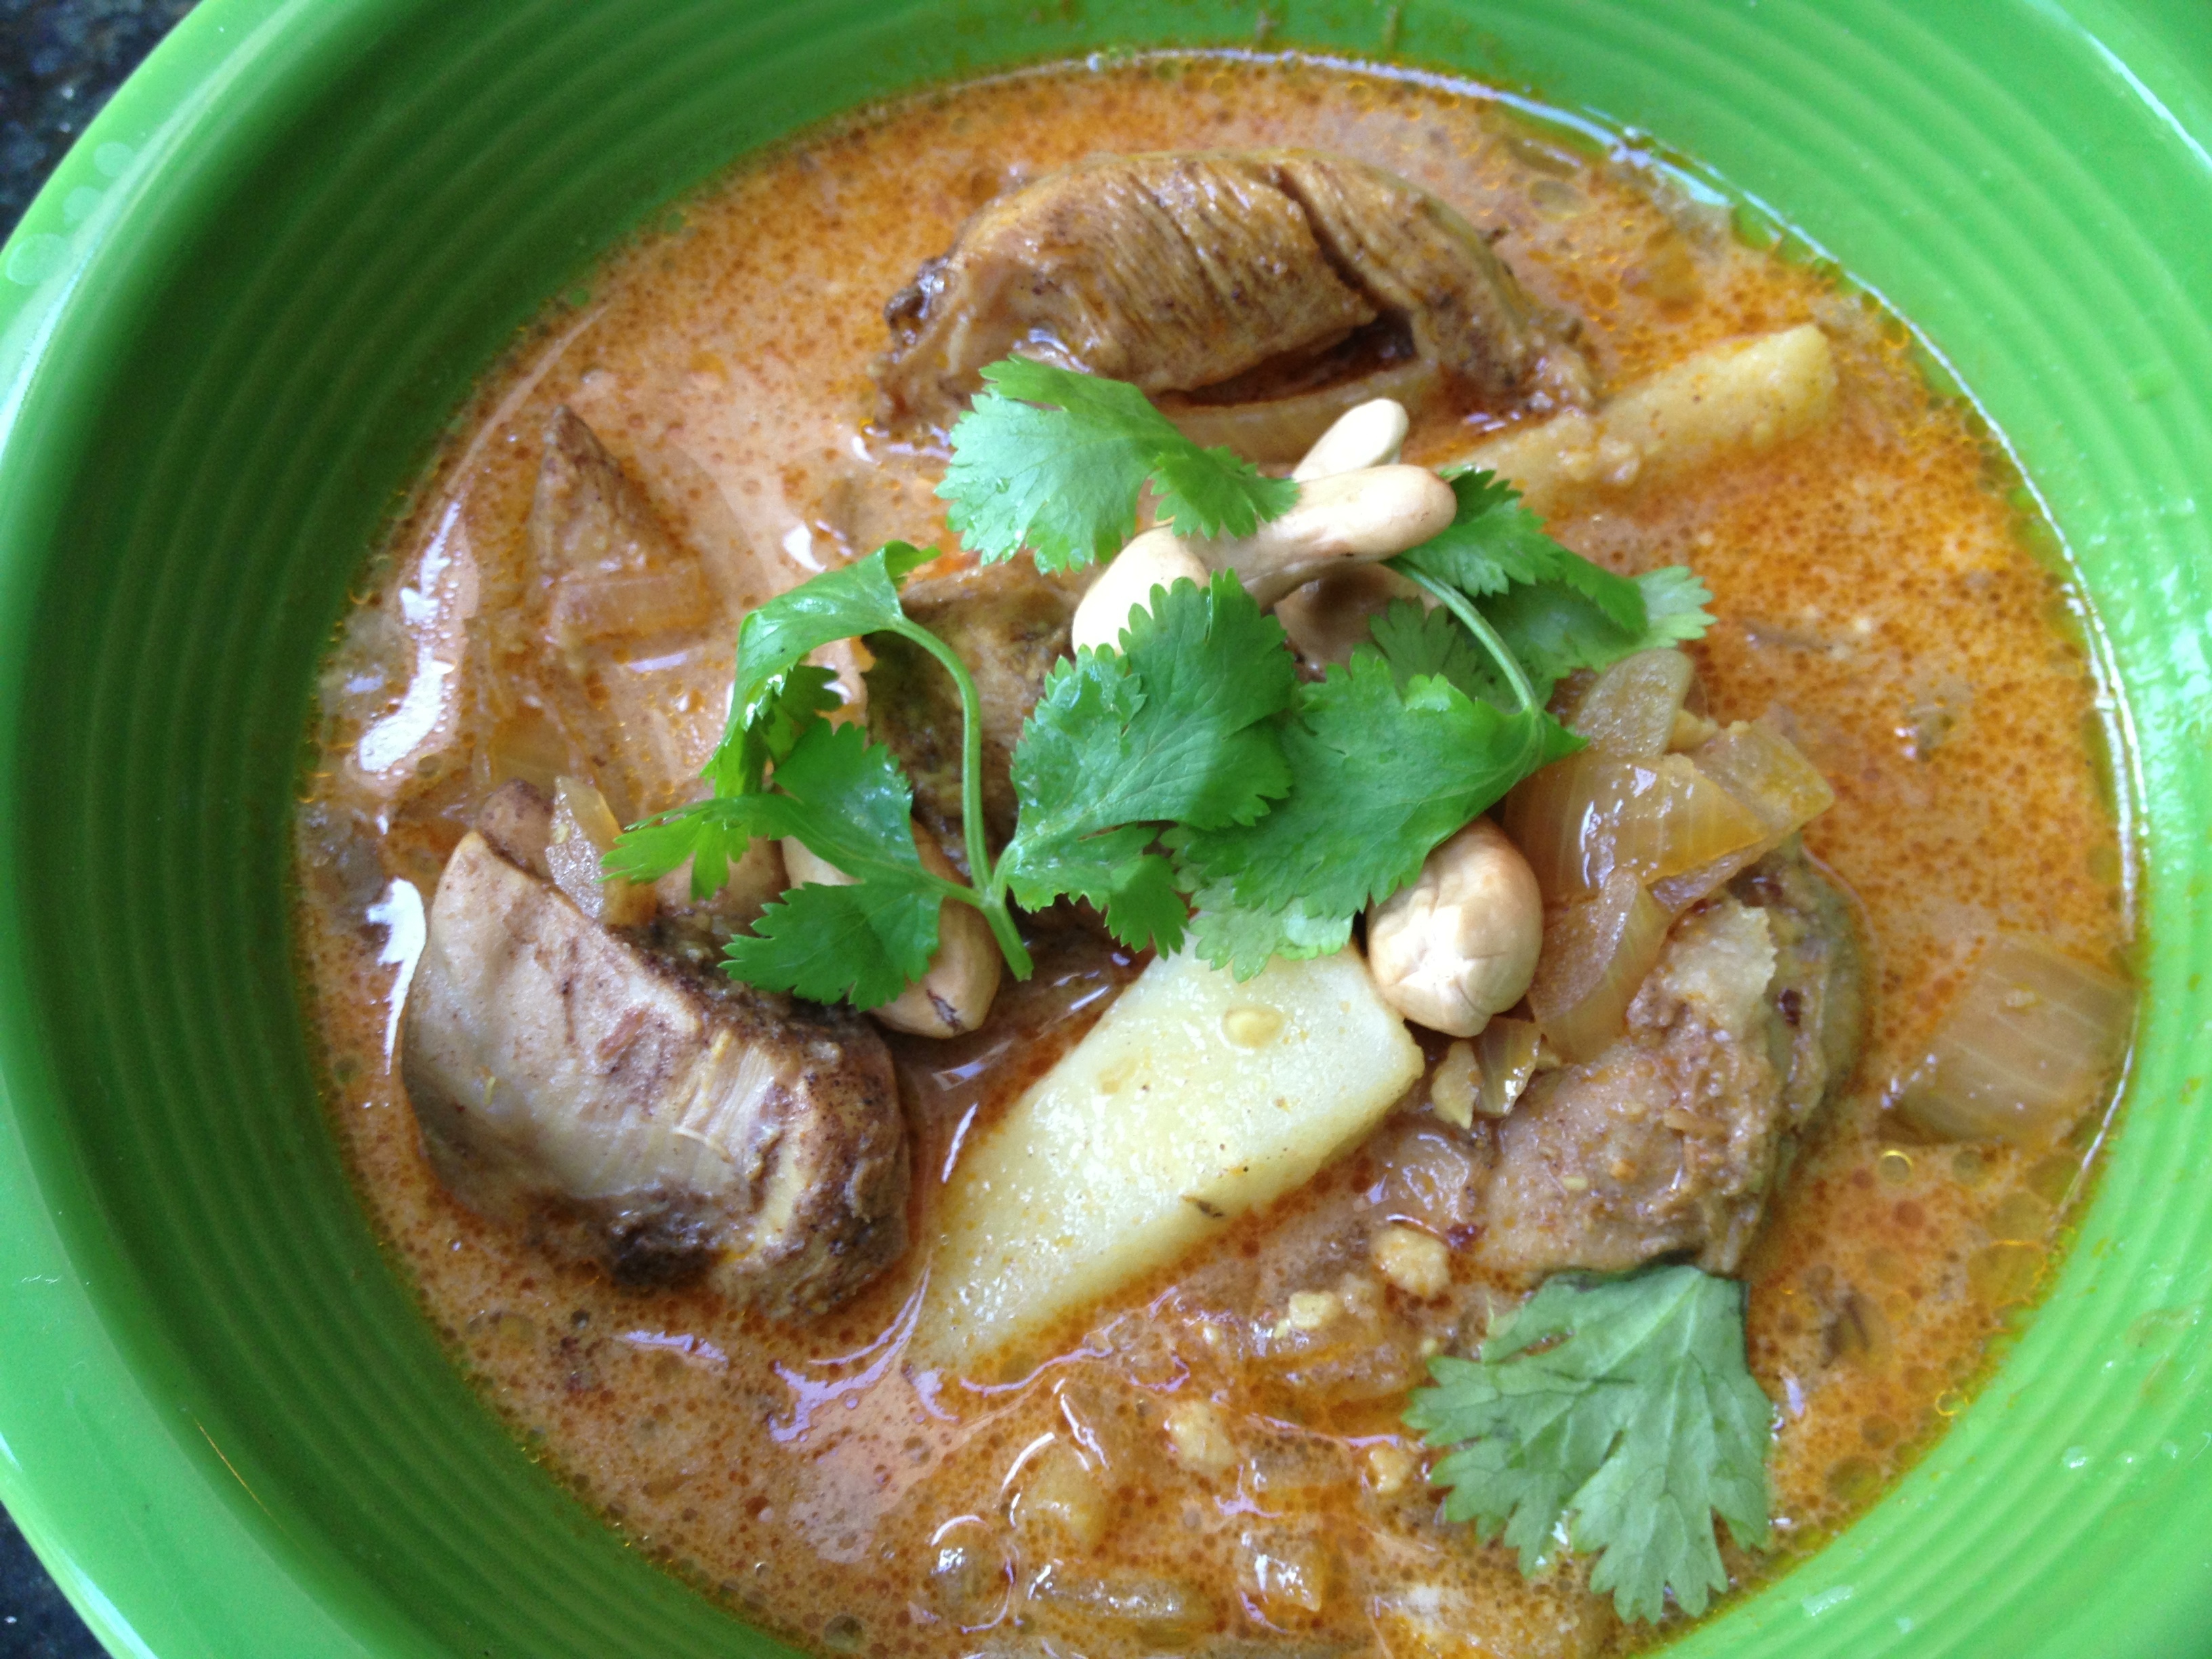
David Tanis’s Coconut Chicken Curry with Cashews, New York Times (1/4/2013), original recipe here

Ingredients:

  • 2 pounds skinless boneless chicken thighs, cut in 3-inch chunks
  • Salt and pepper
  • 1 tablespoon grated ginger
  • 2 teaspoons grated garlic
  • 1/4 teaspoon cloves
  • 1/4 teaspoon fennel seeds
  • 1/4 teaspoon cardamom seeds
  • 1/4 teaspoon allspice berries
  • 1/4 teaspoon cumin seeds
  • 1/4 teaspoon coriander seeds
  • 1/4 teaspoon turmeric
  • 1/4 teaspoon cayenne, or more to taste
  • 3 tablespoons lemon juice
  • 3/4 cup raw cashews
  • 1/4 cup shredded dried unsweetened coconut
  • 1 pound small parsnips, peeled and cut in 2-inch batons, optional
  • 2 tablespoons ghee, coconut oil or vegetable oil
  • 1 1/2 cups finely diced onion
  • 1 tablespoon tomato paste
  • 1 2-inch piece cinnamon stick
  • 3 cups chicken broth or water
  • 1 cup thick coconut milk
  • A few sprigs mint and cilantro for garnish, optional

Preparation

1.
Season chicken generously with salt and pepper and put it in a mixing bowl. Add ginger and garlic and massage into meat. In a dry skillet over medium heat, toast cloves, fennel, cardamom, allspice, cumin and coriander until fragrant, about 2 minutes. Grind the toasted spices to a fine powder in an electric spice mill and add to chicken. Add turmeric, cayenne and lemon juice and mix well. Let marinate at room temperature for at least 15 minutes, or refrigerate up to 1 hour.
2.
Heat oven to 375 degrees. Put cashews on a baking sheet and roast until lightly browned, 8 to 10 minutes. Remove and set aside to cool. Spread the shredded coconut on the baking sheet and toast until lightly browned, about 5 minutes, then let cool. Grind the coconut with 1/4 cup cashews in a spice mill or small food processor to make a rough powder. Reserve 1/2 cup roasted cashews for garnish.
3.
Bring a small saucepan of lightly salted water to a simmer, then add parsnips and cook until tender, about 10 minutes. Drain and cool.
4.
In a wide heavy-bottomed pot, heat ghee over medium-high heat. Add cooked parsnips, if using, and sauté until lightly browned. Remove and reserve. Add chicken pieces to the pot, stirring occasionally until lightly browned, about 5 minutes, then remove and set aside. Add onions and cook until softened, about 5 minutes more. Add tomato paste and let it sizzle with onions for a minute or two. Add broth and bring to a brisk simmer, stirring with a wooden spoon and scraping up any caramelized bits from the pot. Add cinnamon stick, chicken and the ground coconut and cashew mixture. Adjust heat to a gentle simmer, cover and cook for about 30 minutes, until chicken is tender. Taste the sauce and adjust seasoning if necessary.
5.
To finish the dish, stir in coconut milk and add reserved parsnips. Cook for 3 to 4 minutes, until parsnips are heated through and the sauce has thickened slightly. Transfer to a serving bowl and sprinkle with reserved cashews. Garnish with mint and cilantro sprigs, if using.
Advertisement

Fine Cooking Chicken Adobo

I know I was lukewarm about Fine Cooking magazine at first, but I was wrong. Wrong, wrong, wrong! It is officially my new favorite. Please forgive me, Fine Cooking.

Of all the ethnic food I have attempted over the years, I realized this week that I have never once made any Filipino food. Sorry, Filipino friends! Your food is awesome. This recipe was SUCH a huge hit with everyone in our family except for Nate. Usually I have leftovers, but we were fighting for thirds of this dish. The best part about it is you probably already have everything you need right in your pantry. The combination of soy sauce, black pepper, garlic and vinegar (so much vinegar) yields a flavorful, tender chicken. One commenter suggested adding a tablespoon of brown sugar if the vinegar is too much for you, but I thought it tasted perfect exactly as written. Keep that modification in mind, though.

I also realize I was just saying chicken thighs are far superior in the crock pot to chicken breasts, but I do think in the case of this non-crock pot recipe (which calls for thighs) that boneless breasts would be better. That’s me, ever the contrarian. I have a really hard time properly trimming thigh meat, and as a fat-phobic person, a lot of the chicken goes to waste. Even though the recipe calls for thighs, my instincts are telling me breasts might work better. (And I wonder why I get so many hits for porn on this website?).

It is not a pretty dish (hence the itty bitty picture), but it is simple and delicious. Four out of five of us give it an A++, the definition of a winner around here.

Fine Cooking Chicken Adobo with Rice by Adeena Sussman (original recipe here)

1 Tbs. vegetable oil
1-1/2 lb. boneless, skinless chicken thighs, trimmed and cut into 1-inch strips
Freshly ground pepper
4 large cloves garlic, minced
1/2 cup distilled white vinegar
1/2 cup lower-sodium soy sauce
1 dried bay leaf
1 tsp. freshly cracked black peppercorns

Cook rice of your choice. Remove from the heat and set aside with the cover on.

Meanwhile, heat the oil in a heavy-duty 12-inch skillet over medium-high heat. Add the chicken, season with 1/4 tsp. each salt and pepper, and cook, stirring occasionally, until light golden-brown, 4 to 6 minutes. Add the garlic and cook, stirring occasionally, 2 more minutes. Add the vinegar, soy sauce, bay leaf, and pepper. Bring to a boil, reduce the heat to medium low, and simmer until the liquid reduces by about one-quarter, 8 to 10 minutes. Discard the bay leaf.

Just before serving, uncover the rice and fluff it with a fork. Serve the chicken and sauce over the rice.

Cilantro Lime Chicken for the Crock Pot

Sometimes my recipe inspiration comes from unlikely sources. In this case, I first saw this recipe from my friend Samantha (not her real name, but her chosen alias. I’ll give you a second to digest the fact she has a need for an alias). Sam is one of my oldest friends, and once upon a time, she was the Lucy to my Ethel. I could (and probably should) write a whole book devoted to Sam, but today I’ll just share this one story.

Sam’s mother wasn’t much of a cook, so she was not trained in the art of Thanksgiving since childhood. I helped talk her through her first Thanksgiving back in 1993 or 1994. I had thought I covered all of my bases. We went over the recipes and the shopping list and the How To’s, and I believed my little birdie was ready to fly. Then around 5:00 pm, while I was entertaining my own guests, the phone rings.

Sam: I don’t understand! The turkey has been cooking FIVE HOURS and it’s still not done. It’s still pink and bloody and not brown like the pictures.

Me: Wait, FIVE HOURS? I thought you had an eight pound bird. That doesn’t sound right. Maybe your oven is broken. Did you set it for 325 or 350?

Sam: Uhhhh. I thought I was supposed to set the oven for 165 degrees. That’s the number you kept saying. Is that not right?

Me: SAAAAMMMM!!!! 165 is the INTERNAL temperature. Remember? I said you needed a meat thermometer to measure the internal temperature of 165. The OVEN needs to be at 325. No wonder your turkey is raw. I didn’t even know an oven could be set so low.

Sam: I thought internal meant INSIDE THE OVEN, not INSIDE THE TURKEY.

Me: We will laugh about this one day. Enjoy your Thanksgiving pizza!

Perhaps the above illustrates my surprise and delight that my little Sammy has come so far and is now picking out recipes on Pintrest and posting them on Facebook. Hey, it’s a start.

This recipe has all of my winning elements: crock pot, flavorful, easy. Added bonus: My whole family loved it. The only change I made is that I used boneless chicken thighs, as I absolutely hate boneless breasts done in the crock pot. I firmly believe that if you are crockpotting chicken, you either need to go for bone-in breasts or boneless thighs. Not everyone agrees with me, but I feel compelled to share this opinion with you. I served this over rice with a dollop of sour cream, and it was perfect. The author suggests using it for chicken tacos, and I think that’s a brilliant idea.

Cilantro Lime Chicken for the Crockpot (original recipe by Megan from Pip & Ebby here)

In crock pot, mix together:

One 24-ounce jar medium or mild salsa

Juice from one lime

1/4 cup fresh cilantro, chopped

One 1.25-oz. package taco seasoning

2 jalapeno peppers, finely chopped (optional)

2 to 3 pounds of boneless chicken thighs or 3 – 4 bone-in chicken breasts

Directions:

Mix together first five ingredients in crock pot. Cover chicken with mixture. Cook on low for 4 to 6 hours. Shred chicken with a fork (removing any bones if necessary) and return to the crock pot for at least another 20 minutes. Serve with rice or as a taco filling. Top with more fresh cilantro.

I have a thing for cilantro and try to grow some every year. This should be ready in a few more weeks.

I also have a thing for limes, lemons’ classier green cousins.

Ina Garten’s Lemon and Garlic Roast Chicken

I will admit I was a bit skeptical about this recipe when my friend Tess insisted that it created the perfect roasted chicken. The wine, the lemons, ALL THAT GARLIC, and most of all, the bacon? I just didn’t know. I do love all of those ingredients separately (and God knows I love bacon to the point of unhealthiness), but I had my doubts that they would work in their stated quantities and on a chicken. Tess has never steered me wrong, and rarely has Ina, so I gave it a shot. I am so glad that I did! It really did produce a wonderful roasted chicken with skin both crispy and flavorful.

Personally, I loved the gravy. My kids weren’t crazy about it due to the wine (philistines! what do they know, anyway?) and it is definitely jazzier than your traditionally flavored chicken gravy, so next time I make this I will just buy a jar of whatever is on sale for the kids. The chicken itself was moist and tender. Roasted chicken is a big family favorite around here, and this recipe is definitely a keeper.

Ina Garten’s Lemon and Garlic Roast Chicken (original recipe here)

Ingredients

  • 1 (5 to 6-pound) roasting chicken
  • Kosher salt
  • Freshly ground black pepper
  • 1 large bunch fresh thyme
  • 4 lemons
  • 3 heads garlic, cut in 1/2 crosswise
  • 2 tablespoons butter, melted
  • 1/2 pound sliced bacon
  • 1 cup white wine
  • 1/2 cup chicken stock

Directions

Preheat the oven to 425 degrees F.

Remove the chicken giblets. Rinse the chicken inside and out. Remove any excess fat and leftover pinfeathers and pat the outside dry. Place the chicken in a large roasting pan. Liberally salt and pepper the inside of the chicken. Stuff the cavity with the thyme, reserving enough thyme to garnish the chicken dish, 1 lemon, halved, and 2 halves of the garlic. Brush the outside of the chicken with the butter and sprinkle again with salt and pepper. Tie the legs together with kitchen string and tuck the wing tips under the body of the chicken. Cut 2 of the lemons in quarters and scatter the quarters and remaining garlic around the chicken. Lay the bacon slices over the chicken to cover.

Roast the chicken for 1 hour. Remove the bacon slices from the top of the chicken and set aside. Continue roasting the chicken for an additional 1/2 hour, or until the juices run clear when you cut between a leg and thigh. Remove to a platter and cover with aluminum foil while you prepare the gravy.

Remove all but 2 tablespoons of the fat from the bottom of the pan. Add the wine and chicken stock and bring it to a boil. Reduce the heat, and simmer for 5 minutes, or until reduced by half.

Slice the chicken on a platter. Garnish the chicken platter with the bacon slices, roasted garlic, reserved thyme and 1 lemon, sliced. Serve with the gravy.

This is what the chicken looks like after one hour with the bacon on it. Not very appetizing, I know. But you just wait…

This is what the chicken looks like once it’s finished cooking. Beautiful, eh? Tess, Ina and Mom Mom know what they’re talking about.

The Pioneers of Chester County: Chicken Tortilla Soup

My friend had the great idea of reuniting our limoncello crew to make something a little more family friendly, and I was all for it! We decided to go with a soup, and The Pioneer Woman’s Chicken Tortilla Soup seemed to get high marks based on the almost 500 comments on her blog. Not jealous. Really, I’m not. She’s great. But if you want to make any comments here, I sure wouldn’t mind…

We gathered in my friend’s beautiful kitchen, pots in hand, and got to work tripling the recipe. Can you believe I’ve never had chicken tortilla soup? Or ANY tortilla soup? I am always amazed at how little I know about the world.

Three pots for three friends

Picking apart boneless chicken, just like Laura Ingalls Wilder

Beans and Rotel

The final, delicious product.

The verdict: I am calling this soup a success. There were a grand total of fifteen of us who ate this soup for dinner tonight. All three of the husbands loveloveloved it. All three of us pioneer women of Chester County loved it, too. Three children liked it well enough. Two children cried about it. One picky eater ate a small amount. And two boys were too busy with sports to try it as of this publishing, but my prediction is that they will like it. While the soup is very flavorful (one of my son’s called it a burrito in a bowl), I think the toppings really make it shine. Cilantro is a must (unless you think it tastes like soap) and cheese and sour cream and avocado, too.

The Pioneer Woman’s Chicken Tortilla Soup (original printable recipe here)

Ingredients

  • 2 whole Boneless, Skinless Chicken Breasts
  • 1 Tablespoon Olive Oil
  • 1-½ teaspoon Cumin
  • 1 teaspoon Chili Powder
  • ½ teaspoons Garlic Powder
  • ½ teaspoons Salt
  • 1 Tablespoon Olive Oil
  • 1 cup Diced Onion
  • ¼ cups Diced Green Bell Pepper
  • ¼ cups Red Bell Pepper
  • 3 cloves Garlic, Minced
  • 1 can (10 Oz. Can) Rotel Tomatoes And Green Chilies
  • 32 ounces, fluid Low Sodium Chicken Stock
  • 3 Tablespoons Tomato Paste
  • 4 cups Hot Water
  • 2 cans (15 Oz. Can) Black Beans, Drained
  • 3 Tablespoons Cornmeal Or Masa
  • 5 whole Corn Tortillas, Cut Into Uniform Strips Around 2 To 3 Inches
  • _____
  • FOR THE GARNISHES:
  • Sour Cream
  • Diced Avocado
  • Diced Red Onion
  • Salsa Or Pico De Gallo
  • Grated Monterey Jack Cheese
  • Cilantro

Preparation Instructions

Preheat oven to 375 degrees. Mix cumin, chili pepper, garlic powder, and salt. Drizzle 1 tablespoon olive oil on chicken breasts, then sprinkle a small amount of spice mix on both sides. Set aside the rest of the spice mix.

Place chicken breasts on a baking sheet. Bake for 20 to 25 minutes, or until chicken is done. Use two forks to shred chicken. Set aside.

Heat 1 tablespoon olive oil in a pot over medium high heat. Add onions, red pepper, green pepper, and minced garlic. Stir and begin cooking, then add the rest of the spice mix. Stir to combine, then add shredded chicken and stir.

Pour in Rotel, chicken stock, tomato paste, water, and black beans. Bring to a boil, then reduce heat to a simmer. Simmer for 45 minutes, uncovered.

Mix cornmeal with a small amount of water. Pour into the soup, then simmer for an additional 30 minutes. Check seasonings, adding more if needed—add more chili powder if it needs more spice, and be sure not to undersalt. Turn off heat and allow to sit for 15 to 20 minutes before serving. Five minutes before serving, gently stir in tortilla strips.

Ladle into bowls, then top with sour cream, diced red onion, diced avocado, pico de gallo, and grated cheese, if you have it! (The garnishes really make the soup delicious.)


Chicken Corn Chowder

One of my favorite food blogs which I recently discovered is Growling Tummy. As soon as I saw this recipe for Chicken Corn Chowder, I knew it had high potential. And I was right! Four out of five family members loved it (even Mr. Picky), and the only one who didn’t finish it practically fell asleep in his soup due to a very fun sleepover birthday party at the Great Wolf Lodge…so I am not blaming the recipe! Ed said it reminded him a bit of the soup version of chicken pot pie, and I agree. The jalapeno gave it a wonderful kick, and the roasted red pepper added nice color and flavor. I used a rotisserie chicken, too, which made this soup incredibly quick and easy to prepare (albeit a bit pricier). I will definitely be making this again!

Growling Tummy’s Chicken Corn Chowder

Ingredients:

  • 2 tablespoons butter
  • 1/2 cup chopped onion
  • 1/2 cup chopped celery
  • 2 medium potatoes, chopped
  • 1 jalapeño pepper, seeded and minced
  • 3 tablespoons all-purpose flour
  • 3 cups reduced-fat milk
  • 2 cups reduced sodium chicken broth
  • 2 cups chopped roasted skinless, boneless chicken breasts, rotisserie chicken works great here (vegetarians can omit the chicken and its still a great chowder)
  • 1 1/2 cups fresh or frozen corn kernels (about 3 ears, but you can use frozen)
  • 1/4 teaspoon ground red pepper
  • salt to taste
  • 2 roasted red peppers from a jar, chopped
  • 1 (14 3/4-ounce) can cream-style corn

How To:

Melt the butter in a large Dutch oven over medium heat. Add onion, celery, potato and jalapeño and cook for 3 minutes or until tender, stirring frequently. Add flour; cook for 1 minute, stirring constantly. Stir in milk and remaining ingredients. Bring to a boil and cook until thick (about 5 minutes). Reduce heat and serve (biscuits work great as a compliment).

Poule au Pot: French Chicken in a Pot

Everywhere I turn these days, my boyfriend Christopher Kimball is out and about promoting The Cook’s Illustrated Cookbook: 2000 Recipes from 20 Years of America’s Most Trusted Cooking Magazine. Within one week, I heard him on NPR’s Fresh Air and another show I can’t recall (The Splendid Table, maybe?) and both times he was singing the praises of Poule au Pot, otherwise known as “chicken in a pot” to us commoners.

Roasted chicken is a hands-down favorite around here. For all the fancy stuff I try to shove on my family, simple chicken and gravy is always a winner. Poule au Pot is cooked at 250 degrees, low and slow and covered tightly. Needless to say, this is not roasted and you will be sacrificing brown and crispy skin. The tradeoff, however, is soooooo worth it. This chicken is incredibly juicy and intensely flavored, and yet it is a magically, deceptively simple recipe which uses very few ingredients. Our friends at Cook’s Illustrated have figured out that too many vegetables creates too much humidity inside the pot and diminishes the flavor of the chicken. By using just a small amount of aromatics which were browned first, they achieved the flavor infusion without washing out the chicken with too much humidity.

Do not go overboard with the veggies. Shown below is a small bowl of everything aside from salt and pepper which I used, and you can see it’s not much. But when you put it all together and follow the directions? Magic.

French Chicken in a Pot
from the January 2008 edition of Cook’s Illustrated

The cooking times in the recipe are for a 4 1/2 to 5 pound bird. A 3 1/2 to 4 1/2 pound bird will take about an hour, an a 5 to 6 pound bird will take close to two hours. We developed this recipe to work with a 5 to 8 quart pot with a tight-fitting lid. If using a 5-quart pot, do not cook a chicken larger than 5 pounds.

1 whole roasting chicken, giblets removed and discarded, wings tucked under back
2 teaspoons kosher salt or 1 teaspoon table salt
1/4 teaspoon black pepper
1 tablespoon olive oil
1 small onion, chopped medium
1 small celery stick, chopped medium
6 medium garlic cloves, peeled and trimmed
1 bay leaf
1 medium spring of rosemary
1/2-1 teaspoon fresh lemon juice

1. Adjust oven rack to lowest position and heat oven to 250 degrees. Pat chicken dry with paper towel and season with salt and pepper. Heat oil in large Dutch oven over medium heat until just smoking. Add chicken breast-side down; scatter onion, celery, garlic, bay leaf and rosemary around chicken. Cook until breast is lightly browned, about 5 minutes. Using a wooden spoon inserted into cavity of bird, flip chicken breast side up and cook until chicken and vegetables are well browned, 6 to 8 minutes. Remove Dutch oven from heat; place large sheet of foil over pot and cover tightly with lid. Transfer pot to oven and cook until an instant read thermometer registers 160 degrees when inserted in the thickest part of the breast and 175 degrees in the thickest part of the thigh, 80 to 110 minutes.

2. Transfer chicken to carving board, tent with foil and rest 20 minutes. Meanwhile, strain chicken juices from pot through a fine-mesh strainer into fat separator, pressing on solids to extract liquid; discard solids (you should have about 3/4 cup juices). Allow liquid to settle 5 minutes, then pour into saucepan and set over low heat. Carve chicken, adding any accumulated juices to saucepan. Stir lemon juice into jus to taste. Service chicken, passing jus at table.

Food and Wine Vietnamese Chicken Salad

This is a recipe from one of my old Food & Wine cookbooks. It’s perfect to serve for a luncheon, as I did yesterday with my husband’s two beautiful nieces. The ladies insisted it was good enough for this blog (I have such high publishing standards here, you know), so I snapped a quick picture. This salad is the rare combination of light yet substantial: low in fat, high in flavor, and decent nutritional value.

The one thing I might do differently is add a bit more red pepper flakes, or perhaps even some freshly diced hot peppers, assuming my fellow diners liked things hot. I have found it’s worth the effort to shred the cabbage in the food processor rather than just use a bag of cole slaw, but if you’re short on time or lacking a food processor, bagged cole slaw will do just fine.

Food & Wine Vietnamese Chicken Salad

Ingredients

1 1/3 pounds boneless, skinless chicken breasts (about 4)

1 cup canned low-sodium chicken broth or homemade stock

4 scallions including green tops, chopped

1/2 teaspoon salt

1 1/4 pounds green cabbage (about 1/2 head), shredded (about 4 cups)

3 carrots, grated

6 tablespoons chopped fresh mint and/or cilantro (optional)

1/4 cup lime juice (from about 2 limes)

1/4 cup soy sauce or Asian fish sauce (nam pla or nuoc mam)

4 teaspoons sugar

1/4 teaspoon dried red-pepper flakes

1/4 cup chopped peanuts

Directions:

  1. Cut each chicken breast into five diagonal strips. In a medium saucepan, combine the broth, 1/4 of the scallions, and 1/4 teaspoon of the salt. Bring to a simmer, add the chicken, stir, and cover the pan. Cook over low heat for 5 minutes. Turn the heat off and let the chicken steam for 5 minutes. Remove the chicken from the pan and shred it.
  2. In a large bowl, combine the shredded chicken, the remaining scallions, the cabbage, carrots, and 4 tablespoons of the herbs, if using. In a small glass or stainless-steel bowl, whisk together the lime juice, soy sauce, sugar, red-pepper flakes, and the remaining 1/4 teaspoon salt. Toss the salad with the dressing. Sprinkle with the remaining 2 tablespoons chopped herbs and the peanuts.

Pulled Chicken Sandwiches

I first had this chicken at Ed’s nephew’s house during an Eagle’s football game, and I knew right away I would be serving it often. We are lucky to have many of my husband’s relatives close by, so we get to socialize quite a bit. While I am technically “the aunt,”  I think of them more as friends than as kinfolk. In addition to being great friends and family, they are fabulous entertainers who give me some of my best ideas. Thanks for this one, Tiff!

This is from the June 2006 Cooking Light magazine, and you can certainly serve it as is with outstanding results. I, however, like to crockpotify almost anything I can get my hands on, so after I post the regular recipe, I will explain how I modify for the crockpot.

Pulled Chicken Sandwiches

Ingredients:

Chicken:

  • 2 tablespoons dark brown sugar
  • 1 teaspoon paprika
  • 1 teaspoon chili powder
  • 3/4 teaspoon ground cumin
  • 1/2 teaspoon ground chipotle chile pepper
  • 1/2 teaspoon salt
  • 1/4 teaspoon ground ginger
  • 2 pounds skinless, boneless chicken thighs
  • Cooking spray

Sauce:

  • 2 teaspoons canola oil
  • 1/2 cup finely chopped onion
  • 2 tablespoons dark brown sugar
  • 1 teaspoon chili powder
  • 1/2 teaspoon garlic powder
  • 1/2 teaspoon dry mustard
  • 1/4 teaspoon ground allspice
  • 1/8 teaspoon ground red pepper
  • 1 cup ketchup
  • 2 tablespoons cider vinegar
  • 1 tablespoon molasses
  • Remaining ingredients:
  • 8 (2-ounce) sandwich rolls, toasted
  • 16 hamburger dill chips

Preparation:

  • Prepare grill.
  • To prepare chicken, combine first 7 ingredients in a small bowl.
  • Rub spice mixture evenly over chicken. Place chicken on a grill rack coated with cooking spray; cover and grill 20 minutes or until a thermometer registers 180°, turning occasionally. Let stand for 5 minutes. Shred with 2 forks.
  • To prepare sauce, heat canola oil in a medium saucepan over medium heat. Add onion; cook for 5 minutes or until tender, stirring occasionally. Stir in 2 tablespoons sugar and next 5 ingredients (through pepper); cook 30 seconds. Stir in ketchup, vinegar, and molasses; bring to a boil. Reduce heat, and simmer 10 minutes or until slightly thickened, stirring occasionally. Stir in chicken; cook 2 minutes or until thoroughly heated.
  • Place about 1/3 cup chicken mixture on bottom halves of sandwich rolls; top each serving with 2 pickle chips and top roll half.
Note: The chicken and sauce can be made up to two days ahead and stored in the refrigerator.

David Bonom, Cooking Light
JUNE 2006

Dawn’s Crockpotification and Notes Follow:

Rub spice mixture above onto both sides chicken thighs and place in crockpot on low.

After several hours, chicken will look like this. Don’t be alarmed!

Remove chicken from crockpot and place on a plate. Drain most of the liquid from the crockpot. Return chicken to crockpot, and pull it apart using two forks. This should be very easy and look like this once you’re finished:

You’re almost done! Add the barbecue sauce, and keep on lowest setting until serving. The barbecue sauce is very easy to make and has a great flavor, so I highly suggest giving it a try…but I won’t judge you if you use something from a jar!

p.s. I have to apologize for the poor lighting on these pictures. It was a dreary day yesterday, and the natural light was minimal. Looking at them today, they have a bit of a creepy and unappetizing vibe, but trust me, it is a good recipe!

Mexicasserole

As much as I like to fancy myself a highfalutin foodie, the sad reality is cooking for kids has knocked me down off my high horse many years ago. A nice example of how my children have humbled me: decent casseroles and crockpot dishes excite me as much as truffle oil. More so, in fact.

Years ago my friend Bonnie shared a recipe which won a contest in the Sunday Parade Magazine (that’s a division of Food & Wine, no?), and its many incarnations have been a hit with the family ever since. I rarely make this the same way twice, but this is a very forgiving recipe which allows much room for improvisation and substitutions. Leftovers are always rare.

Mexicasserole

1 pound of chicken, poached and shredded

2 cups restaurant style tortilla chips, crushed

1 can red kidney beans, rinsed well and drained

1 can black beans, rinsed well and drained

1 can of corn, drained

8 oz. can of tomato sauce

1 cup salsa

1 teaspoon salt

1/2 cup red onion, chopped

1 red or green pepper cut into 1/4 inch dice

1/4 cup chopped cilantro

1 clove of garlic, minced

12 – 16 oz. grated cheddar

Diced tomatoes to garnish

Preheat oven to 350 degrees. Spray bottom of 13 x 9 inch baking dish and line with crushed tortilla chips. Combine everything but the cheese in a large bowl and mix well. Place half the mixture atop the tortilla chips, and sprinkle half the cheese over the mixture. Cover with the remaining half of the chicken-bean mixture, and then top with remainder of cheese. Bake for 30 – 35 minutes, and let stand for 5 minutes before serving.